R eviewing and revising student work at GCSE or A-level is a crucial part of the teaching and learning process and one way to encourage this is to use a simple formula: Save, Erase, Develop (SED). This post looks at how your students can review and revise their written work using this formula. It can also, if you use them, be easily integrated into Structure Strips.
As someone who writes stuff for a living – from sociology textbooks, through film scripts, and biographies to the odd – actually, very odd – novel in my spare time – one of the very few things I’ve learnt is the importance of reviewing and revising what I’ve written: what eventually appears on the printed page or screen is never what first appeared on my page. Everything I’ve ever written has gone through a process of review and revision that involves:
• keeping stuff that works.
• removing stuff that doesn’t.
• developing stuff that needs more work…
And if you’re wondering what this preamble has to do with your teaching and learning, wonder no more.
I chanced across this basic idea on Pinterest through an idea called “Keep it, Bin it, Build it” broadly aimed at helping younger students redraft their work to bring it into line with various assessment objectives (such as “answering the question”…). I have no idea who originally created it but I thought it was a helpful idea that could be applied to just about any level of work or subject. As is my wont – and because I can – I thought I’d make it a little bit snappier (hence “Save, Erase, Develop”) and turn it into a simple mnemonic.
Again, because I can.
And also because it gave me a little pun to use as a title.
Anyway.
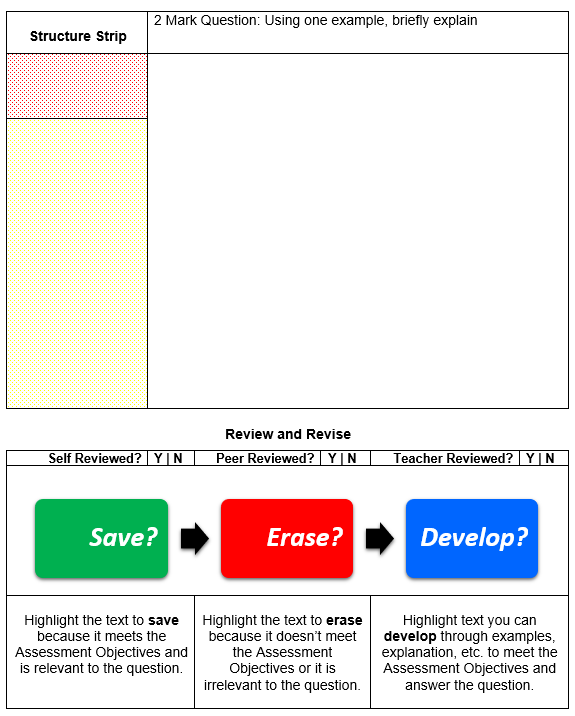
The easiest way to understand what SED involves (and like some of the very best ideas, it’s incredibly easy to understand and simple to use) is to have a look at it. I’ve created a couple of different versions you can use with your students, depending on how they create and submit work:
1. SED cut-out: if students submit hand-written work they can cut and physically paste the SED strip onto the page at the end of the work.
Alternatively, if they wordprocess their work they can cut-and-paste the SED document into their finished document.
2. SED and Structure Strips: if you use structure strips with your students I’ve created a document that embeds SED into a blank Structure Strip template.
Both versions are Word documents you can share with your students and these can be easily edited to your specific requirements.
Write, Review, Revise…
The basic process is, as I’ve suggested, very simple to grasp and implement:
Write: Set your students a question. Make sure they have or understand the assessment objectives against which their answer will be marked. This can be a piece of homework, classwork or whatever (it’s also a process that can be easily adapted to flipped teaching – the students complete the work outside the class and review / revise it in class time).
Review: After they’ve written their answer it can be reviewed in three main ways (or indeed a combination of these ways):
• Self review, where the student goes through their own work editing it in line with AO instructions.
• Peer review: students swap their answers and review each other’s work.
• Teacher review: this can involve marking the original piece of work and asking the student to review and rewrite it in line with any suggestions for improvement you make. Alternatively, you can review the work with individual students who then rewrite it in line with your agreed suggestions to improve it.
Revise: Once the initial work has been reviewed the student then rewrites their answer in line with the agreed revisions.
Although the SED process may initially take a bit of time for students to grasp, once they’ve used it a few times they should find it a simple and effective way of constructing answers to questions that will serve them well when they sit their final exams.
In the Review process, encourage your students to use a consistent highlight strategy for the material they’ve created to help them keep track of the various continuities and changes:
• Save: Highlight text to keep in green.
• Erase: Highlight text to remove in red.
• Develop: Highlight text to improve in blue.
You can, of course, use whatever colours you think most appropriate.
As a teacher you should also find that while, in the short term, you will be doing more marking and reviewing, in the long-term your workload should diminish as students submit work that is more coherent, focused on assessment objectives and much easier and quicker to mark…
Share This Post

Discover more from ShortCutstv
Subscribe to get the latest posts sent to your email.